If you've ever wished for a dessert that’s both show-stopping and surprisingly simple, let me introduce you to this Red Velvet Cheesecake Recipe. It beautifully marries that classic red velvet allure with the dreamy creaminess of cheesecake—without ever turning on the oven!

Jump to:
Why You'll Love This Recipe
I honestly can’t get enough of how vibrant and luscious this red velvet cheesecake looks on the table—it’s the kind of dessert that instantly puts a smile on every guest’s face. Plus, it’s no-bake, so it’s refreshingly fuss-free for any season.
- No Oven Needed: Achieve a silky, rich cheesecake texture without heating up your kitchen.
- Delicious Oreo Base: Adds a crunchy, chocolaty foundation that contrasts perfectly with the creamy filling.
- Classic Red Velvet Flavor: The iconic red hue and subtle cocoa notes come through beautifully with a touch of chocolate and red food coloring.
- Elegant Whipped Cream Topping: Lightly sweetened and finished with dark chocolate shavings for that wow factor.
Ingredients & Why They Work
Gathering the right ingredients is key to nailing this no-bake red velvet cheesecake. I recommend softening your cream cheese ahead and making sure your cream is cold for perfect whipping. Here’s a quick rundown of what you’ll need and why each element matters.

- Oreo cookies: These form a chocolaty, crunchy crust with just the right sweetness and texture contrast against the creamy filling.
- Unsalted butter: Melts into the crushed Oreos to bind the base firmly without overpowering flavors.
- Gelatine powder (unflavoured): Essential for setting the no-bake filling firmly yet smoothly.
- Water: To bloom the gelatine, activating it for a perfect set.
- Heavy/thickened cream: Used twice—once whipped into the filling for lightness and again for the fluffy whipped topping.
- Cream cheese (softened): The superstar of the filling, offering that rich, tangy creaminess classic to cheesecakes.
- Caster sugar (superfine): Dissolves easily for smooth sweetness in both filling and topping.
- Vanilla extract: Adds warmth and depth to the cream cheese and whipped cream layers.
- 70% chocolate (or dark): Brings bittersweet complexity to the filling—trust me, it’s the magic touch.
- Red food colouring: This gives that signature red velvet color—especially important to nail the iconic look.
- Shaved or grated dark chocolate (optional): Perfect for stabilizing the whipped cream topping and adding chocolatey texture when garnishing.
Make It Your Way
The beauty of this Red Velvet Cheesecake Recipe is how effortlessly it can be tailored to suit your tastes and occasions. Whether you want to tweak the base, adjust the decadence level, or add a personal twist to the topping, there's plenty of room to make it truly yours.
- Oreo variations for the base: I love experimenting with different Oreo flavors—try Golden Oreos for a lighter, buttery base or double stuf if you want extra richness. It changes the vibe completely and is always a crowd-pleaser.
- Dairy-free adaptation: For those looking to skip dairy, use a plant-based cream cheese substitute and coconut cream to whip up the filling and topping. Just keep the gelatine or swap it for agar agar for vegan friendliness.
- Seasonal toppings: Fresh raspberries or candied pecans on top add a burst of color and texture that's perfect for holidays or celebratory occasions.
- Chocolate twist: Mix in white chocolate instead of dark for a sweeter filling or swirl melted chocolate into the mousse for a marbled effect that works wonders visually.
Step-by-Step: How I Make Red Velvet Cheesecake Recipe

Step 1: Setting Up for Success with the Pan
Start by flipping your 20cm (8-inch) springform pan upside down. This little trick makes removing the cheesecake a breeze later on. Lightly butter the base, then press on a square of baking paper. Clip the pan sides on top, letting the extra paper peek out for easy handling. Don’t forget to butter and line the sides, too—it helps prevent any sticking mishaps that can spoil your perfect edges.
Step 2: Crafting the Crunchy Oreo Base
Crush 200 grams of Oreo cookies finely until they resemble fine crumbs. You can use a food processor or place them in a plastic bag and bash with a rolling pin. Mix the crumbs with 60 grams of melted unsalted butter, ensuring every crumb is well coated. Firmly press this mixture into the prepared pan base, creating an even layer. Pop it into the fridge to firm up while you take on the filling—this chilling strengthens that all-important crunch.
Step 3: Blooming and Melting Gelatine
Gelatine is key for this no-bake cheesecake’s perfect set. Sprinkle 2 teaspoons of unflavored gelatine powder over 2 tablespoons of water and let it bloom for 5 minutes—you’ll see it absorb the water and become jelly-like. Then gently warm the gelatine until fully dissolved, either over a double boiler or in short microwave bursts, stirring to get a smooth liquid. Set this aside, ready for the filling.
Step 4: Whipping the Cream to Soft Peaks
In a cold bowl, whip 1 cup of heavy/thickened cream straight from the fridge until soft peaks form. Soft peaks mean when you lift the whisk, the cream holds shape but the tip gently folds over—this texture is perfect for folding into the filling for lightness without deflating it.
Step 5: Blending the Cream Cheese Mixture
Beat together 500 grams of softened block cream cheese with ¾ cup caster sugar and 1 teaspoon vanilla extract until luxuriously smooth and creamy. Taking care to soften your cream cheese beforehand will help you avoid lumps for that velvety finish.
Step 6: Melting and Adding Chocolate and Colour
Gently melt 150 grams of 70% or dark chocolate over a double boiler or in short microwave bursts. Stir until glossy and smooth, then quickly fold the melted chocolate and 6 teaspoons of red food colouring into your cream cheese mixture. This gives you that signature red velvet vibrancy combined with rich chocolate flavor—one of the secrets to this cheesecake’s striking charm.
Step 7: Incorporating Gelatine and Folding in the Whipped Cream
Stir the dissolved gelatine into your cream cheese and chocolate mixture until fully combined. Then gently fold in the whipped cream from earlier, taking care not to flatten it. This gentle folding keeps the filling light and airy—exactly what you want for that melt-in-your-mouth texture.
Step 8: Assembling and Chilling the Cheesecake
Pour the luscious filling over the chilled Oreo base in your springform pan. Smooth the top with a spatula and refrigerate uncovered for at least 4 hours until set. This resting time is essential to achieve the perfect firmness and that silky finish every slice deserves.
Step 9: Whipping the Dreamy Topping and Finishing Touches
Whip 1 ¼ cups of cold heavy cream with 3 tablespoons caster sugar and 1 teaspoon vanilla extract until stiff peaks form. For extra stability and texture, I like to fold in 2 tablespoons of grated or shaved dark chocolate. Spread or pipe this heavenly cream evenly over your set cheesecake, then garnish with more dark chocolate shavings if you like a little extra flair.
Step 10: Chill Before Serving
Pop the finished cheesecake back into the fridge until completely firm and chilled. When ready, carefully remove the springform sides and peel away the baking paper from the base. Slice, serve, and watch your guests’ faces light up!
Top Tip
These tips come from hands-on experience making this Red Velvet Cheesecake Recipe, helping you avoid common pitfalls and get the best results every time.
- Use an Inverted Springform Pan: Flipping the springform pan base upside down and lining it with baking paper makes removing your cheesecake a breeze and keeps the edges pristine.
- Keep Your Cream Cheese Softened: Softened cream cheese beats up smoother with no lumps, giving your filling that luscious, velvety texture.
- Chill Your Bowls and Cream: Cold cream whips faster and holds its shape better — a simple trick to get those perfect soft or stiff peaks!
- Don’t Skip the Gelatine Blooming: Allow the gelatine to bloom fully before heating to avoid clumps and ensure your cheesecake sets beautifully without a bake.
How to Serve Red Velvet Cheesecake Recipe

Garnishes
Garnishing this dessert is your chance to get creative! Fresh raspberries or strawberries add a bright, tart note that cuts through richness. For extra decadence, sprinkle a handful of dark chocolate shavings or curls over the whipped cream topping. If you’re feeling festive, a light dusting of edible gold glitter or red sugar crystals amps up the wow factor and photographability.
Side Dishes
This Red Velvet Cheesecake pairs beautifully with light accompaniments. A simple fresh fruit salad or a crisp green salad with citrus dressing can balance the richness when served as part of a larger dessert spread. For beverages, a glass of sparkling rosé, coffee, or even a smooth vanilla chai makes an excellent companion.
Make Ahead and Storage
Storing Leftovers
Store any leftover cheesecake covered tightly with plastic wrap or an airtight container in the refrigerator. Properly stored, it will stay fresh and creamy for up to 4 days — giving you plenty of time to enjoy every last delicious slice.
Freezing
This cheesecake freezes well! For best results, freeze it without the whipped cream topping first. Wrap the cheesecake tightly in plastic wrap and then foil to prevent freezer burn. Freeze for up to 1 month. Thaw overnight in the refrigerator before adding whipped cream topping and serving.
Reheating
Since this is a no-bake, chilled cheesecake, it’s best served cold. Avoid reheating, which can ruin its texture. Simply allow frozen cheesecake to thaw fully in the fridge for optimal creaminess.
Frequently Asked Questions:
Absolutely! While Oreo cookies give that perfect chocolatey crunch, you can substitute with chocolate graham crackers, digestive biscuits, or your favorite chocolate cookies for a slightly different flavor and texture.
Yes, gelatine is key to helping the cheesecake set firmly without baking. Make sure to bloom and fully dissolve it as described to avoid lumps and get that perfect creamy but stable texture.
Definitely! The cheesecake needs at least 4 hours of chilling to set properly, so making it a day ahead works perfectly. Just whip the topping fresh on the day you plan to serve, or add it before storing if preferred.
The red food colouring is essential for achieving that signature vibrant red velvet color that makes this cheesecake visually stunning. Use the recommended 6 teaspoons to get that classic deep red hue, especially important for authenticity.
Final Thoughts
There’s something truly special about combining the indulgence of cheesecake with the nostalgic charm of red velvet — and this no-bake Red Velvet Cheesecake Recipe brings both together effortlessly. Whether it’s a birthday, holiday, or just a treat to impress, I hope this dessert fills your kitchen with joy and your guests with delight. Take your time with the chilling, enjoy every luscious bite, and don’t forget to share — good desserts are best enjoyed together!
Print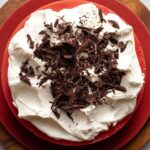
Red Velvet Cheesecake Recipe
- Prep Time: 30 minutes
- Chilling Time: 4 hours
- Cook Time: 0 minutes
- Total Time: 4 hours 30 minutes
- Yield: 12 servings 1x
- Category: Dessert
- Method: No-Cook
- Cuisine: American
- Diet: Vegetarian
Description
A stunning no-bake red velvet cheesecake that combines the bold, vibrant flavor of red velvet cake with the creamy, rich texture of cheesecake. This dessert features a crunchy Oreo cookie base, a luscious cream cheese and chocolate filling with a velvety smooth finish, and whipped cream topping accented with dark chocolate shavings. Perfect for impressing guests at special occasions.
Ingredients
Base
- 200 g Oreo cookies (1.5 standard packs)
- 60 g unsalted butter, melted
Filling
- 2 tsp gelatine powder (unflavoured)
- 2 tbsp water
- 1 cup heavy/thickened cream, fridge cold
- 500 g cream cheese, softened (block form)
- ¾ cup caster sugar / superfine sugar
- 1 tsp vanilla extract
- 150 g 70% chocolate or dark chocolate
- 6 tsp red food colouring
Topping
- 1 ¼ cups heavy/thickened cream, fridge cold (for whipping)
- 3 tbsp caster sugar / superfine sugar
- 1 tsp vanilla extract
- 2 tbsp shaved or grated dark chocolate (optional, for stabilising cream and garnish)
Instructions
- Prepare the pan base: Flip the base of a 20cm / 8-inch springform pan upside down for easy cheesecake removal. Very lightly butter the pan base, then press a square sheet of baking paper onto it. Clip the pan sides onto the base, allowing excess paper to stick out the sides for easy removal later. Butter and line the pan sides with more baking paper.
- Make the base crust: Crush Oreo cookies finely until they resemble crumbs. Mix the crushed Oreos with melted unsalted butter until well combined. Press this mixture firmly and evenly into the prepared pan base. Place in the refrigerator to set while you prepare the filling.
- Bloom the gelatine: Sprinkle the gelatine powder over the 2 tablespoons of water in a small bowl and let it bloom (absorb the water) for about 5 minutes.
- Heat the gelatine: Gently warm the bloomed gelatine until fully dissolved, either over a double boiler or briefly in the microwave. Set aside.
- Whip the cream for filling: In a chilled bowl, whip 1 cup of heavy/thickened cream until soft peaks form. Set aside.
- Prepare the cream cheese mixture: In a large mixing bowl, beat the softened cream cheese with caster sugar and vanilla extract until smooth and creamy.
- Melt the chocolate: Gently melt the 70% chocolate over a double boiler or in short bursts in the microwave, stirring until smooth and glossy.
- Combine and colour the filling: Quickly stir the melted chocolate and red food colouring into the cream cheese mixture until evenly combined.
- Add gelatine to filling: Stir the dissolved gelatine into the cream cheese and chocolate mixture to incorporate.
- Fold in whipped cream: Gently fold the whipped cream into the cream cheese mixture until fully combined and smooth, taking care not to deflate the whipped cream.
- Assemble the cheesecake: Pour the filling over the chilled Oreo base in the springform pan, smoothing the top with a spatula. Refrigerate for at least 4 hours or until set.
- Prepare whipped cream topping: In a chilled bowl, whip 1 ¼ cups heavy/thickened cream with caster sugar and vanilla extract until stiff peaks form. Optionally, fold in grated dark chocolate to stabilize the cream and add texture.
- Finish the cheesecake: Spread or pipe the whipped cream topping evenly over the set cheesecake. Garnish with additional dark chocolate shavings if desired.
- Chill and serve: Refrigerate the cheesecake until completely firm and chilled. Carefully remove the springform sides and the base baking paper before serving.
Notes
- This cake is a no-bake showstopper combining red velvet and cheesecake flavors with a creamy, light, and chocolatey texture.
- Using a springform pan inverted with baking paper makes cheesecake removal easy and clean.
- Ensure cream cheese is softened to avoid lumps in the filling.
- Use chilled cream and bowls for best whipping results.
- Red food colouring makes the classic red velvet hue, particularly important for an authentic appearance.
- Chilling the crust and filling ensures proper setting and texture.
- Optionally stabilize whipped cream topping with grated dark chocolate to keep it from deflating.
- This recipe yields 12 generous servings and is ideal for special occasions.
Nutrition
- Serving Size: 1 serving
- Calories: 540 kcal
- Sugar: 29 g
- Sodium: 210 mg
- Fat: 43 g
- Saturated Fat: 25 g
- Unsaturated Fat: 14 g
- Trans Fat: 0.2 g
- Carbohydrates: 37 g
- Fiber: 2 g
- Protein: 6 g
- Cholesterol: 103 mg


Leave a Reply