If you’re craving a rich, creamy treat but want to skip the oven, this No-Bake Oreo Cheesecake Cups Recipe is your new best friend. These mini delights combine crunchy Oreo bases with a silky dairy-free filling—perfect for anytime indulgence!

Jump to:
Why You'll Love This Recipe
I remember the first time I made these mini no-bake cheesecakes—it felt like magic how something so simple came together without ever heating the oven! They’re creamy, crunchy, and totally dairy-free, making them a perfect treat to whip up in no time.
- Vegan and Dairy-Free: Made with wholesome plant-based ingredients that everyone can enjoy.
- No Oven Required: Perfect for hot days or last-minute dessert emergencies.
- Crunchy and Creamy: That Oreo cookie crust pairs so perfectly with the smooth cheesecake filling.
- Mini Portions: Seriously cute and portion-controlled, ideal for parties or just treating yourself.
Ingredients & Why They Work
When I shop for this recipe, I always focus on finding quality dairy-free cream cheese and whipping cream to get that rich, smooth texture. And of course, standard Oreo cookies create the perfect crunchy base—plus, they’re vegan friendly, which is a win-win!

- Oreo Cookies: These form the crunchy base and add that classic cookies-and-cream flavor everyone loves.
- Dairy-Free Butter / Margarine: Helps bind the Oreo crust while keeping this recipe vegan-friendly.
- Dairy-Free Whipping Cream: Gives the cheesecake its luscious, airy texture without dairy.
- Dairy-Free Cream Cheese: For that rich, tangy creaminess—my go-to brands are Violife or Sainsbury’s Free From options.
- Additional Oreo Cookies: Crushed into the filling for added texture and used as decoration to finish the look.
Make It Your Way
One of the best things about this No-Bake Oreo Cheesecake Cups Recipe is how easily you can tweak it to suit your tastes or dietary needs. Whether you want to add a little extra crunch or swap up the flavours, these mini cheesecakes are super adaptable!
- Variation: For a nutty twist, try folding in some crushed toasted almonds or walnuts into the cheesecake filling. The added texture contrasts beautifully with the smooth creaminess of the filling. I tried this at a family gathering, and everyone loved the subtle crunch – it gave the dessert an unexpectedly delightful depth.
- Dairy-Free and Vegan Friendly: Using dairy-free butter, cream cheese, and whipping cream keeps these cheesecakes totally plant-based. I often make them for friends who avoid dairy, and they're always amazed at how rich and luscious the result is.
- Seasonal Spin: Around the holidays, I add a pinch of cinnamon or a drop of peppermint extract to the filling for a festive flavour. Just a tiny touch transforms these into a holiday treat without losing that classic Oreo charm.
Step-by-Step: How I Make No-Bake Oreo Cheesecake Cups Recipe

Step 1: Crafting the Perfect Oreo Crust
First up, melt your dairy-free butter gently over low heat until it's fully liquid but not hot. While that’s happening, blitz 150 grams of Oreo cookies in your blender or food processor until they’re wonderfully fine – almost like sand. Pour those cookie crumbs into the melted butter and stir until combined. It should look like damp sand that holds together when you press it. Now, press this mixture firmly into each cookie cup tin. A firm press is key here to make sure the base won’t crumble later. Once shaped, pop them into the freezer to chill while you prepare the filling.
Step 2: Whipping Up the Dreamy Cheesecake Filling
In a medium bowl, combine 260 grams of dairy-free whipping cream with 160 grams of dairy-free cream cheese. Start whipping on low speed to keep things from splattering, then increase to high and whip for about 5 minutes until the mixture is thick and creamy. If you have a stand mixer with a balloon whisk, that's your best tool here – but a hand whisk works too if you’re ready for a bit of an arm workout! Next, blend 8 Oreo cookies finely and fold them gently into your fluffy cream mixture. Fill a piping bag fitted with a large round tip nozzle and you’re ready to assemble.
Step 3: Assembling and Freezing Your Cheesecake Cups
Pipe the cheesecake filling evenly on top of your chilled Oreo crust bases, smoothing the tops with an offset spatula for a neat finish. Freeze the cups for at least 4 hours until they’re firm to the touch – this step is crucial to getting that perfect hold and clean release from your tins. If you’re using push-up tins, gently push up the base to release the cheesecakes. If they're not firm enough, they could crumble, so patience here pays off!
Step 4: The Finishing Touch – Swirls and Crumbles
Just before serving, whip 20 grams of dairy-free whipping cream on high speed until thick and luscious. Transfer to a piping bag fitted with an open star tip and pipe a swirl on top of each cheesecake cup. To complete your masterpiece, garnish with half an Oreo cookie and sprinkle with some crushed Oreo crumbs. The contrast of textures and those classic Oreo flavours make every bite unforgettable.
Step 5: Serving and Storing Your Mini Desserts
These little delights are best enjoyed fresh but can be stored in the refrigerator for up to 2 days. Keep them chilled until ready to serve, and watch them disappear fast! Trust me, once you try this No-Bake Oreo Cheesecake Cups Recipe, they'll become a go-to for any occasion.
Top Tip
Making these No-Bake Oreo Cheesecake Cups Recipe is such a joy, and a few handy tips can really take your mini cheesecakes from good to unforgettable. Here’s what I’ve learned while perfecting this dessert!
- Press the Base Firmly: I’ve found that pressing the Oreo crumb mixture firmly into the tins with clean hands really helps prevent crumbling when you remove the cheesecakes. Don’t be shy about compacting it well!
- Whip Slowly Then Fast: Starting slow and then whipping on high speed for the dairy-free cream and cream cheese mix saves you from splashes and results in that perfectly thick, creamy filling you want.
- Freeze Before Removing: Freezing the cups for a full 4 hours is crucial. Trying to unmold them too early almost always led to breakage in my experience, so patience really pays off here.
- Use A Piping Bag: Piping the cheesecake filling and whipped cream topping not only looks professional but also helps get just the right amount in each cup. It’s a technique I rarely skip now!
How to Serve No-Bake Oreo Cheesecake Cups Recipe

Garnishes
These mini cheesecakes are already super cute and irresistible, but you can elevate them further by adding extra garnishes. Consider a light dusting of cocoa powder, a sprinkle of crushed Oreo crumbs, or a few fresh berries like raspberries or strawberries for a pop of color and freshness. A drizzle of dairy-free chocolate sauce or caramel can also add a decadent touch for special occasions.
Side Dishes
Since these are mini desserts, they’re perfect alongside lighter sides that won’t overwhelm their flavor. Try serving with a small dish of fresh fruit salad or a simple mint tea to balance the richness. They also pair beautifully with vegan coffee drinks or your favorite plant-based milk latte for a cozy finish to any meal.
Make Ahead and Storage
Storing Leftovers
Keep your No-Bake Oreo Cheesecake Cups chilled in the refrigerator and enjoy them within 2 days for the best texture and flavor. Cover them well with plastic wrap or store in an airtight container to keep them fresh and prevent absorbance of fridge odors.
Freezing
If you want to make these ahead or save extras, freezing works wonderfully. After assembling and setting the cheesecake cups with the filling, freeze them for 4 hours or until firm. You can then store them frozen for up to a week. Before serving, thaw in the fridge for a few hours to soften slightly but keep their shape.
Reheating
No need to reheat these — they’re best enjoyed chilled. Just allow them to sit at room temperature for about 10 minutes after removing from the fridge or freezer to take the chill off and bring out the creamy texture.
Frequently Asked Questions:
Absolutely! They actually need to freeze for 4 hours to set properly, so making them ahead is perfect. You can prepare them a day in advance and store in the fridge after freezing.
I love using Violife Original Cream Cheese or Sainsburys Own Free From Soft Cream Cheese. Both are vegan-friendly and give that smooth, creamy consistency needed for the filling.
You can try, but Oreo Cookies lend their classic chocolate flavor and texture that’s key to this recipe. If substituting, choose a sturdy chocolate cookie and expect some flavor variation.
Store these mini cheesecakes in the fridge and consume them within 2 days for the best freshness and texture.
Final Thoughts
These No-Bake Oreo Cheesecake Cups Recipe are a delightful treat that’s easy to make and sure to impress, whether you’re serving close friends or just indulging yourself. The rich, creamy dairy-free filling combined with the crunchy chocolate cookie base makes for a match made in dessert heaven. I hope these tips and storage advice help you enjoy every bite with zero fuss. Happy baking (or rather, no baking!) and enjoy the sweet satisfaction these little cups bring!
Print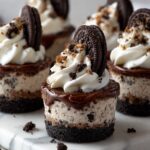
No-Bake Oreo Cheesecake Cups Recipe
- Prep Time: 20 minutes
- Freezing Time: 4 hours
- Cook Time: 5 minutes
- Total Time: 4 hours 25 minutes
- Yield: 6 servings 1x
- Category: Dessert
- Method: No-Cook
- Cuisine: American
- Diet: Vegan
Description
Delicious Mini No-Bake Oreo Cheesecakes made with a dairy-free base and creamy, whipped cheesecake filling. These easy-to-make treats feature a crunchy Oreo cookie crust topped with a smooth, dairy-free cream cheese and whipping cream blend, finished with a swirl of whipped cream and Oreo decoration. Perfect for vegan and dairy-free dessert lovers.
Ingredients
Base Ingredients
- 150 g Oreo Cookies
- 50 g dairy-free butter / margarine
Cheesecake Filling Ingredients
- 260 g dairy-free whipping cream (1 pot of Elmlea Plant Based Alternative Double cream)
- 160 g dairy-free cream cheese (such as Violife Original Cream Cheese or Sainsburys Own Free From Soft Cream Cheese)
- 8 Oreo cookies
Topping Ingredients
- 20 g dairy-free whipping cream
- 4 Oreo cookies
Instructions
- Prepare the Base: Melt the dairy-free butter or margarine in a small saucepan over low heat. Remove from heat and pour into a medium heatproof mixing bowl. In a blender or food processor, crush the Oreo cookies into fine crumbs. Combine the Oreo crumbs with the melted butter and stir well until it resembles wet sand and holds shape when pressed. Press the mixture firmly into each cookie cup tin using clean hands, compacting it well. Place the tins into the freezer while preparing the filling.
- Make the Cheesecake Filling: In a medium bowl, add the dairy-free whipping cream and cream cheese. Whip on low speed first to avoid splashing, then increase to high speed until thick and creamy, about 5 minutes, using a stand mixer with a balloon whisk or a hand whisk. Blend 8 Oreo cookies until fine and fold them into the whipped mixture. Transfer the filling to a piping bag fitted with a large round tip.
- Assemble the Cheesecakes: Pipe the cheesecake filling evenly into each prepared cookie cup. Smooth the tops with an offset spatula. Freeze for 4 hours or until firm to the touch. To remove from push-up tins, gently push up the bases; if not firm, they may crumble.
- Prepare and Add the Whipped Topping: Before serving, whip 20 g of dairy-free whipping cream on high speed until thick, using a stand mixer with a balloon whisk. Transfer to a piping bag fitted with an open star tip and pipe a swirl on top of each cheesecake. Garnish with half an Oreo cookie and some crushed Oreo crumbs.
- Serve and Store: Enjoy immediately or store the cheesecakes in the refrigerator. Best eaten within 2 days.
Notes
- Store finished cheesecakes in the refrigerator for up to 2 days to maintain freshness and texture.
- Use vegan, dairy-free cream cheese such as Violife Original Cream Cheese or Sainsburys Own Free From Soft Cream Cheese to keep it dairy-free and vegan-friendly.
- Press the base mixture firmly to prevent crumbling when removing from tins.
- These cheesecakes must be frozen for at least 4 hours to set properly before removal.
Nutrition
- Serving Size: 1 mini cheesecake
- Calories: 220 kcal
- Sugar: 15 g
- Sodium: 105 mg
- Fat: 14 g
- Saturated Fat: 6 g
- Unsaturated Fat: 7 g
- Trans Fat: 0 g
- Carbohydrates: 20 g
- Fiber: 1 g
- Protein: 2 g
- Cholesterol: 0 mg


Leave a Reply