There's something so comforting about a warm, cheesy sushi-inspired dish that hits all the right notes. This Salmon Sushi Bake Recipe takes the beautiful flavors of sushi and transforms them into a cozy, shareable casserole that's perfect for casual dinners or parties.

Jump to:
Why You'll Love This Recipe
I have to say, this Salmon Sushi Bake has quickly become one of my go-to dishes when I want sushi vibes without all the rolling and fuss. It’s loaded with rich flavors, easy to make in one pan, and everyone I serve it to always asks for seconds.
- Simplicity Meets Flavor: No delicate sushi rolling skill required, just layers of deliciousness baked to perfection.
- Great for Sharing: This recipe bakes in a casserole dish, making it perfect for feeding a crowd or meal prepping.
- Customizable Layers: You can adjust spice levels, swap garnishes, or even try other fish easily.
- Impress Without Stress: It looks impressive on the table, yet comes together with minimal effort and fuss.
Ingredients & Why They Work
This dish shines because it balances rich, creamy, spicy, and umami flavors all layered on warm sushi rice. Choosing quality ingredients makes all the difference and helps keep the flavor bright and fresh.

- Wild Sockeye Salmon: Its firm texture and bold flavor stand up beautifully to baking and blending with spicy mayo.
- Soy Sauce: Brings salty depth and enhances the salmon’s natural flavors without overpowering.
- Sticky Sushi Rice: The foundation of this dish – it holds everything together while staying fluffy.
- Rice Vinegar: Adds a subtle tang to the rice that cuts richness and gives that signature sushi rice flavor.
- Nori Sheets: Layering nori inside helps mimic the sushi roll experience and adds that seaweed umami.
- Cream Cheese: Gives creamy indulgence and a luscious texture between layers.
- Sriracha Mayonnaise: Brings just the right kick of heat with a velvety finish.
- Green Onions: Freshness and a mild onion bite that lightens the dish.
- Eel Sauce: Sweet and savory glaze that drizzled on top makes every bite crave-worthy.
- Furikake Rice Seasoning: Adds crunch, sesame seeds, and seaweed notes – a perfect finishing touch.
Make It Your Way
One of the things I love most about this Salmon Sushi Bake Recipe is how easy it is to tweak to your tastes. I often switch up the spiciness or try adding different garnishes to keep things exciting.
- Variation: I once swapped the wild sockeye for smoked salmon just to see how it’d turn out — it was divine, with an even smokier depth paired with creamy cheese.
- Make it Vegan: For plant-based friends, you can swap salmon with marinated grilled tofu and use vegan cream cheese for a fun twist.
- Seasonal Additions: Thin slices of fresh mango or avocado on top add a refreshing sweetness that contrasts nicely with the spicy mayo.
- Mild Version: Skip or reduce the sriracha mayo for a gentler flavor profile perfect for kids or those sensitive to heat.
Step-by-Step: How I Make Salmon Sushi Bake Recipe

Step 1: Bake Salmon to Perfection
First up, preheat your oven to 400°F. I like to use wild sockeye salmon here for its rich color and firm texture. Place the salmon on parchment-lined baking sheet and drizzle the soy sauce evenly on top. Pop it in the oven for about 15 minutes until it flakes easily but still stays juicy — keep an eye so it doesn't dry out.
Step 2: Prepare Your Sushi Rice Base
While the salmon cooks, bring out your baking dish and spray it well with nonstick spray. Spread the cooked sticky sushi rice evenly, then drizzle the rice vinegar over it. Mix gently by hand to ensure every grain gets that touch of tang, then firmly press the rice to form an even layer — this helps keep the bake stable later.
Step 3: Layer Nori and Cream Cheese
Next, carefully lay the nori sheets over the rice, trimming with scissors if needed. This seaweed layer adds beautiful umami and captures that classic sushi essence. Spread the softened cream cheese evenly on top of the nori — I find using a flat frosting spatula really helps get a smooth, even layer without tearing the nori.
Step 4: Mix and Spread the Salmon Topping
Once the salmon is out of the oven and cooled slightly, peel off the skin and crumble the fish into a bowl. Stir in your sriracha mayonnaise thoroughly to coat every flake in that creamy, spicy goodness. Then, spread this mixture evenly over the cream cheese layer — try to be gentle here so you keep the layers intact.
Step 5: Bake to Set and Garnish
Bake the whole assembled dish at 400°F again for about 10 to 15 minutes until the salmon topping is set and lightly golden. Let it cool for at least 10 minutes — this step helps it slice neatly. Before serving, sprinkle furikake seasoning, drizzle with eel sauce, and top with chopped scallions. I like to add thin slices of radish, cucumber, and jalapeño for crunch and freshness.
Top Tip
After making this Salmon Sushi Bake Recipe several times, I’ve learned a few tricks that really help it shine every single time. These tips saved me from soggy layers and bland bites.
- Use Sticky Sushi Rice: Don't substitute with regular rice — the sticky texture is key to holding the bake together.
- Spread Cream Cheese Evenly: Make sure your cream cheese is soft and use a flat spatula for a smooth layer that won't tear the nori.
- Don’t Overbake the Salmon: Keep your fish juicy by watching the bake closely — 15 minutes is plenty at 400°F.
- Let It Cool Before Slicing: Cutting while still hot can make a mess — patience pays off with neat, tidy squares.
How to Serve Salmon Sushi Bake Recipe

Garnishes
I’m a big fan of fresh, crunchy garnishes on my sushi bake. Thin slices of cucumber and radish add wonderful texture, while jalapeño brings just a little zing that complements the creamy spicy salmon so well. Sometimes I toss on pickled ginger or avocado slices for color and balance.
Side Dishes
Keep it simple with a crisp green salad or a bowl of miso soup to round out the meal. Lightly steamed edamame or seaweed salad also pair beautifully with this dish for a full sushi-inspired feast without the fuss.
Creative Ways to Present
For special occasions, I’ve served this in small individual ramekins—baking single portions that look adorable and personalized. Another fun way is to arrange the sliced squares on a platter and garnish each with microgreens or edible flowers for an elegant touch.
Make Ahead and Storage
Storing Leftovers
Leftovers keep well covered in the fridge for up to 3 days. I store mine in an airtight container to preserve freshness and prevent the nori from getting soggy. When you’re ready to eat, just slice and enjoy cold or warmed slightly.
Freezing
I haven’t personally frozen the entire bake because the texture of the rice changes upon thawing, but you can freeze the salmon mixture separately in small portions. Just thaw and spread on freshly prepared rice layers when you want a quick bake.
Reheating
Reheat leftovers gently in the oven at 300°F for about 10 minutes or until warmed through. Avoid microwaving if possible to keep the nori crisp and prevent the rice from becoming gummy. Cover loosely with foil to retain moisture while warming.
Frequently Asked Questions:
Absolutely! While wild sockeye salmon gives rich flavor and great texture, you can substitute with cooked or smoked salmon, tuna, or even crab meat depending on your preference. Just make sure the fish is cooked and flaked well before layering.
The spice level mostly depends on the amount of sriracha mayonnaise you add. You can easily adjust it to your taste by using less or more sriracha or by skipping the spicy mayo altogether for a milder taste.
Yes! You can assemble the bake a few hours in advance and refrigerate it before baking. Just bring it back to room temperature before putting it in the oven to ensure even cooking.
Let the bake cool completely to firm up before slicing. Use a sharp knife dipped in hot water between cuts for clean slices. Serving smaller squares makes it easier for guests to enjoy a variety of flavors.
Final Thoughts
This Salmon Sushi Bake Recipe brings together some of my favorite kitchen moments — easy prep, layered flavors, and those happy smiles from family and friends as they dig in. It’s a feel-good comfort food with a classy twist, and I can’t recommend it enough. Give it a try soon; I bet it’ll become a new staple in your rotation too!
Print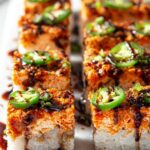
Salmon Sushi Bake Recipe
- Prep Time: 30 minutes
- Cook Time: 25 minutes
- Total Time: 55 minutes
- Yield: 12 pieces 1x
- Category: Main Course
- Method: Baking
- Cuisine: Japanese Fusion
- Diet: Halal
Description
This Salmon Sushi Bake is a crowd-pleasing fusion dish that layers tender baked wild sockeye salmon, sticky sushi rice, nori sheets, cream cheese, and spicy sriracha mayonnaise, all baked together and topped with flavorful furikake seasoning, eel sauce, and fresh garnishes like cucumber and jalapeño. It offers a comforting yet fresh take on sushi, perfect for parties or family dinners.
Ingredients
Salmon Layer
- 1 ½ - 2 pounds wild sockeye salmon filet
- 2 tablespoons soy sauce
- ½ cup sriracha mayonnaise
Rice Layer
- 32 ounces ready-made cooked sticky rice (or 3 cups dried sushi rice, cooked according to package)
- 2 tablespoons rice vinegar
- 1-2 tablespoons furikake rice seasoning
Assembly
- 2-3 nori sheets
- 16 ounces cream cheese (softened to room temperature)
- 3 tablespoons eel sauce (or oyster sauce)
- ½ cup chopped green onions
- Optional garnishes: thinly sliced radish, cucumbers, jalapeño, avocado, and/or pickled ginger
Instructions
- Preheat and Prepare Salmon: Preheat the oven to 400°F. Line a large rimmed baking sheet with parchment paper. Place the salmon filet on the parchment and drizzle 2 tablespoons of soy sauce over the top.
- Bake Salmon: Bake the salmon for 15 minutes until cooked through. Remove from oven and let cool slightly.
- Prepare Rice Layer: Spray a 9 x 13-inch baking dish with nonstick cooking spray. Transfer the cooked sticky rice into the dish. Drizzle 2 tablespoons rice vinegar over the rice and toss gently by hand. Press the rice firmly into an even layer at the bottom of the dish.
- Add Nori Sheets: Lay the nori sheets evenly over the rice, trimming with scissors if necessary to cover the entire surface.
- Spread Cream Cheese: Using a large flat frosting spatula, spread the softened cream cheese evenly over the nori sheets covering the rice layer.
- Prepare Salmon Mixture: Remove the skin from the cooled salmon and crumble the flesh into a mixing bowl. Add the sriracha mayonnaise and mix well until combined.
- Top with Salmon Mixture: Evenly spread the salmon and sriracha mayo mixture over the cream cheese layer in the baking dish.
- Bake Final Layer: Place the baking dish back in the oven and bake for 10 to 15 minutes until the salmon topping is set and slightly firm.
- Cool and Garnish: Remove the sushi bake from the oven and let cool for at least 10 minutes or refrigerate until cold before cutting. When ready to serve, cut into 12 to 24 pieces. Sprinkle furikake rice seasoning on top, drizzle with eel sauce, and scatter chopped green onions over each piece.
- Add Optional Garnishes: Garnish with thin slices of cucumber, radish, jalapeño, avocado, or pickled ginger for fresh crunch and flavor enhancements.
Notes
- Use wild sockeye salmon for the best flavor and texture; other salmon varieties can be substituted if needed.
- Ready-made cooked sticky rice saves time, but if using dried sushi rice, be sure to cook it according to package instructions for proper stickiness.
- Softened cream cheese spreads more evenly and creates a smooth layer—allow cream cheese to come to room temperature before using.
- Furikake seasoning adds a savory, umami-rich crunch; substitute with toasted sesame seeds if unavailable.
- Optional fresh garnishes add texture and a pop of color, making the dish more visually appealing and balanced in flavor.
- Letting the sushi bake cool before slicing helps maintain the layers intact and prevents it from falling apart.
Nutrition
- Serving Size: 1 piece
- Calories: 325 kcal
- Sugar: 2 g
- Sodium: 511 mg
- Fat: 17 g
- Saturated Fat: 5 g
- Unsaturated Fat: 10 g
- Trans Fat: 0.02 g
- Carbohydrates: 26 g
- Fiber: 0.2 g
- Protein: 17 g
- Cholesterol: 56 mg


Leave a Reply